Friday, September 30, 2011

A couple of projects


I have a couple of new projects I'm going to be posting this weekend. I don't have good pictures of them so I'm going to wait until daylight tomorrow to take some. I will be posting after pictures of several things I've completed in the last couple of days.
Here is a nightstand that I picked up at a garage sale for $5
And here is a dresser that has a matching nightstand just like the above one (except for color) that I got at a garage sale for $30 for both.
Tomorrow I will be posting pictures of these two pieces finished. I did them in white and distressed them on the edges to give them a shabby chic look. Check back in later!

Wednesday, September 28, 2011

Goodwill Coffee Table

This was a five dollar coffee table I got at Goodwill. At first I just had plans to re-paint it and make it a bit more cute but then a blemish on the top made me re-think my whole project. I painted the table ivory, then used black watered down acrylic paint to make a glaze which I rubbed on and wiped off according to my liking. Here's how it looked after the paint job.
.
You can't tell in the picture but there was a spot on the top where a bottom layer of paint had chipped off. It was a really noticable blemish and I didn't know what to do about it. After thinking about it for several days and putting a bunch of ideas together I came up with the idea of making an ottoman/or bench. I really like old grain sacks (especially French ones) so I created my own out of burlap and sharpie. I bought the burlap from Walmart for under $3 a yard. I printed out some different ideas from other french burlap projects from around the internet. When put under the burlap you can see the printed font and go over it with sharpie.
Once I had my foam cut to size for the top, I used spray adhesive to secure it to the top of the table. After I had all my font traced on my burlap I placed it on top of the foam then flipped the table so that I could hot glue the sides down.
Here's one side done and hot glued.
The above picture is during the process.
Here it is all finished as an ottoman in the living room. It'd be so cute with a tray on it with some hot cocoa!
and here it is by the front door as a bench.
I really love how it turned out but don't have a perfect place for it. I will be selling it, if you're interested, let me know! I definitley plan to do more projects very similar to this one. Maybe a shabby chic chair next!

$2 Craigslist End Table

I got this end table for $2 off of Craigslist. It was only a short drive from my house so I went and picked it up. It sat in my garage for a while and I didn't know exactly what I wanted to do with it.
When I was at Home Depot picking up casters for my personalized crate I browsed the "Oops" paint section. This is paint that has been messed up, mis-tinted, and marked down. I found a deep blue and thought it was a cool color for $5 for the gallon. I decided I'd use it on my end table and distress it a little. I asked Jeff whether to paint the handle black or white and he chose white. I like the crisp contrast of the white against the dark blue. What do you think?
.
.

Tuesday, September 27, 2011

Personalized Crate

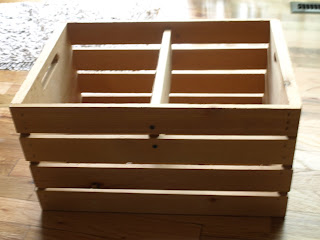
I'm very excited about my next project because I know it's so useful and something I'll always use as easy storage. I bought a wood crate at Goodwill for $2.39 and went to Home Depot for casters. I bought the second smallest size and they were $2.99 a piece. So altogether this project cost me about $15.
Before I put the casters on I printed out my design but I mirrored it. I was trying a technique I saw on pinterest and I used a paint brush to brush water over my lettering while it was face down on the wood. This didn't work...I think I have the wrong kind of printer to be able to do this. Instead, I re-printed a mirrored image and layed my ink face down onto the wood and rubbed the back really hard with a sharpie with the cap on. This transfered the ink well enough so that I could go over it with and ultra fine sharpie. I love this personalized piece, the top number is the date Jeff and I got married (July 14, 2007) and the city is where we got married. This will be something I will definitely keep around! Love how it turned out.
.
As for my bookpage wreath, I found a spot for it on my wall. I really like how it looks next to my front door in my living room. It was too thick to put on my front door so I had to find the next best spot.
On the home front, Emily had a better night last night. I spent the last two nights sleeping in the spare bedroom on a futon with the monitor. I didn't want our screaming, teething baby to wake my husband every hour when he has to get up at 5:30.
.
Jeff and I have a king size bed and once we go to sleep we like our own space. I didn't think it'd be a big deal to stay on the futon for a few nights but last night when we went to bed we were both missing each other very much (even though we were in the next bedroom from each other). I'm definitely sleeping in my own bed tonight next to my wonderful husband..and most likely snuggling!

Monday, September 26, 2011

Cheap, Personalized art

My next project is just something I tried one day when I had all the materials on hand. I took a piece of wood, added craft stickers to create my quote and then spray painted. Once the paint was dry, I peeled off all of the stickers and had super cheap, cute art to add to my office/spare room. remember to think about what color you want showing and paint your wood that color, mine was already painted and I didn't mind the color for a fast project.
Instead of using craft stickers you could also purchase vinyl stickers, just figure out how many of each letter you'd need for whatever quote you decide to use. Home Depot has vinyl letters for $.58 a piece. My craft stickers weren't super sticky so I think vinyl stickers would help with the paint not getting underneath and this would result in more crisp letters.
.
.
On another note....I really hope we all get some more sleep tonight. Emily has started teething and ran a low fever last night. She was in a lot of pain and screamed all night. We probably got about 2 hours of sleep and nothing seemed to help much. I picked up some homeopathic medicine at the health store today, I'm hoping that will relieve her some.

Sunday, September 25, 2011

Unconditional Love

Just what I'm thinking about this morning:
.
I love my baby girl, Emily, unconditionally. I love her even if she's had a horrible night of sleep, up every 1-3 hours (like last night). I love her even if she's cranky for no apparent reason. The Father's love for us is the same. He loves us unconditionally. I'm so thankful for that. :)
Have an awesome Sunday, I'll be posting later!

Saturday, September 24, 2011

Upcoming projects

Stay tuned for my many projects I'll be posting about in the coming days including:
Before and After dresser
Before and After Goodwill distressed coffee table
Before and After $2 Craigslist end table with "Oops" paint from Home Depot
Super quick and easy art
Colorful Inspirational Quote art
Wood crate project
Barn Door project (possibly a kitchen table)

Fall Wreath


My inspiration for this project came from Craftberry Bush's post here. Her wreath turned out beautiful and I just love the colors. I'm really into making crafts out of book pages lately so I decided to make my wreath out of all book pages instead of using coffee filters. Here's how it turned out:
.
I really like it but don't have the perfect spot for it yet. I began with a foam wreath form and took each book page and ripped it into thirds.
.
I took each third, crumbled it up, and stuck a pin through it.
.
I pinned until the wreath form was covered. I then took some fake fall leaves I had in my fall decorations and traced them onto music paper and cut them out (3) to make my leaves. I found some sticks from outside, stuck them on the wreath and TA-DA, a cute and cheap DIY fall wreath. The fun thing is that no one has one exactly like mine. You can personalize it anyway you want to, maybe add a small monogram, maybe hang a miniture version of FALL bunting from my previous post across the middle, maybe add some fall colors, the options are endless.

Friday, September 23, 2011

DIY Book Page Bunting

I love bunting. It's so cute, not only for parties but for dressing up old windows, a mantle, a mirror, etc. I decided to make a FALL bunting for across the mirror hung in my living room and I loved it so much that I made one to hang across an old door I have hung in my spare room.
This is a super easy and cheap DIY. All I did was cut triangles out of vintage book pages, traced my letters the size I needed straight from my computer to the paper and filled them in with sharpie. I then punched holes in the corners of the triangles and put hole reinforcers on the back. To finish, I threaded some twine through the paper (so that the twine went to the back of the triangle) and then I hung my creation. So easy, so cheap, and so cute.

Thursday, September 22, 2011

HELLO Kitty


So, I am officially done with Riley's Hello Kitty birthday cake. I started on the cake last night and finished baking and shaping it by bed time. To do this, I baked a strawberry cake according to the box in a round pan (10 in). After letting it cool for about an hour I tipped it upside down against my base and gently tapped the bottom of the pan for it to release. After the cake was released I used a template I had made out of paper and cut out the shape of Hello Kitty.
After refrigerating the cake for the night I did a crumb coat over the whole cake. This is a very light layer of frosting over the entire cake to hold crumbs in place. After the crumb coat hardens a bit, the final layering of frosting can be done. I used cream cheese frosting I had made (yummmm). After frosting I drew with a knife very lightly in the frosting where kitty's bow would go.
Every couple of minutes I would place the cake in the freezer for several minutes to let the frosting harden a bit again (this made it easier to work with). Once I had my outlines ready it was time for the fun part...or the tedious part...decorating! You would think it would be fun and exciting since I was nearing the end. The outlining was the tedious, difficult part. The black icing in a bottle would take a while to start coming out, then it came out too fast, then too slow, then too fast...you get my point. Anyways, I finally finished and placed black licorice cut into thirds on for whiskers.
.
So, that's it, let me know what you think. HAPPY 3rd BIRTHDAY RILEY!

Wednesday, September 21, 2011

Hello Kitty

Super excited about a cake I'm baking for a very special 3 year old. My cousin's little girl, Riley, will be 3 tomorrow and I get the privledge of making her a Hello Kitty birthday cake! I'll be posting pictures (hopefully tomorrow) once it's completed.

No-Low Cost Art


I'm a huge pinterest fan...like pinning everyday. I get a lot of fun ideas to try for my house. The following project was pinterest inspired.
I was able to create this with no cost because I already had all the supplies. I used a piece of plywood I had in my garage, but you could use a canvas.
I began with mod-podging old book pages onto the plywood and you don't have to use expensive store bought mod podge (make your own by mixing equal parts of elmer's glue and water in a glass jar). After the book pages dried I painted with black watered down paint both vertically and horizontally, not worrying about total coverage (this gives a warn, distressed look). When the black paint dried I worked on the letters. I have yet to buy a silhouette machine so I do my letters the old fashion way.
I find the font I want to use on Word and type my words out in the size I need. I then trace right from my computer screen on to tissue paper with a pen. Once the black paint is dried I trace the words again with a sharpie (this time silver so it will show on the black paint). The sharpie will bleed through the tissue paper onto your work surface, just make sure you're pressing firmly and not tracing too fast.
Once all my words were traced onto my project I filled the letters in with the silver sharpie, you could also paint them.
To give the letters a distressed look I watered down some more black paint and rubbed it lightly over the letters in certain areas with a paper towel. I then sanded the edges of the plywood very lightly to reveal some more color of the book pages.
And that's it...now a no or low cost piece of art with whatever saying you want! You could use a favorite quote, lyrics from a song, or scripture.

Tuesday, September 20, 2011

New Blog

I have decided to recreate my blog. I will be posting pictures of my projects, DIY ideas, pictures I take, maybe some things about my family, etc. Hope everyone enjoys. :)